Birthday Wishes Template
Creating a Birthday Wishes Template with HTML, CSS, and JavaScript
Do you want to add a special touch to your birthday wishes? How about a creative and interactive birthday wishes template that will surprise and delight you? In this tutorial, we will learn how to create a birthday wishes template using HTML for structure, CSS for styling, and JavaScript for interactivity. Let’s get started! (Creating a Birthday Wishes Template with HTML, CSS, and JavaScript)

HTML and CSS Structure
We start by setting up the basic structure of our birthday wishes template using HTML and also designing with CSS Style. Here’s the code for our HTML and CSS file:
!DOCTYPE html>
<html lang="en">
<head>
<meta charset="UTF-8">
<meta name="viewport" content="width=device-width, initial-scale=1.0">
<link rel="preconnect" href="https://fonts.googleapis.com">
<link rel="preconnect" href="https://fonts.gstatic.com" crossorigin>
<link href="https://fonts.googleapis.com/css2?family=Lilita+One&display=swap"
rel="stylesheet">
<title>Birthday Template - StudyMuch "studymuch.in"</title>
<style>
body {
background: url("wishbdy.jpg") no-repeat center center fixed;
background-size:200%;
margin: 0;
height: 100vh;
display: flex;
justify-content: center;
align-items: center;
overflow: hidden;
}
.container {
position: relative;
width: 100%;
margin: 20px;
height: 100%;
display: flex;
justify-content: center;
align-items: center;
flex-wrap: wrap;
}
.heart {
font-size: 60px;
cursor: pointer;
margin: 20px;
color:red;
transition: transform 0.3s, opacity 0.3s;
}
.happy-birthday {
font-size: 30px;
color: rgb(162, 0, 255);
font-family: "Lilita One", sans-serif;
font-weight: 200;
transition: transform 0.5s, opacity 0.5s;
}
@keyframes bounce {
0%, 100% {
transform: translateY(0);
}
50% {
transform: translateY(-10px);
}
}
.bounce {
animation: bounce 1s infinite;
}
#bdywish{
display: flex;
flex-direction: column;
justify-content: center;
align-items: center;
}
#bdywish h3{
font-size: 50px;
background: linear-gradient(65deg, rgb(0, 128, 255),
rgb(195, 0, 255), red);
-webkit-background-clip: text;
background-color: text;
-webkit-text-fill-color: transparent;
display: inline-block;
font-family: "Lilita One", sans-serif;
font-weight: 400;
margin-bottom: 0px;
font-style: normal;
}
#msg{
margin-top: 5px;
font-size: 20px;
color: white;
}
#girlimg{
width: 100px;
height: 80px;
}
.heart-frame {
width: 200px;
height: 200px;
background-color: white;
border: 3px solid rgb(123, 0, 255);
box-shadow: 2px 7px 10px rgb(123, 0, 255);
border-radius: 50%;
position: relative;
overflow: hidden;
}
.heart-frame img {
width: 100%;
height: 100%;
border-radius: 50%;
}
</style>
</head>
<body>
<div class="container">
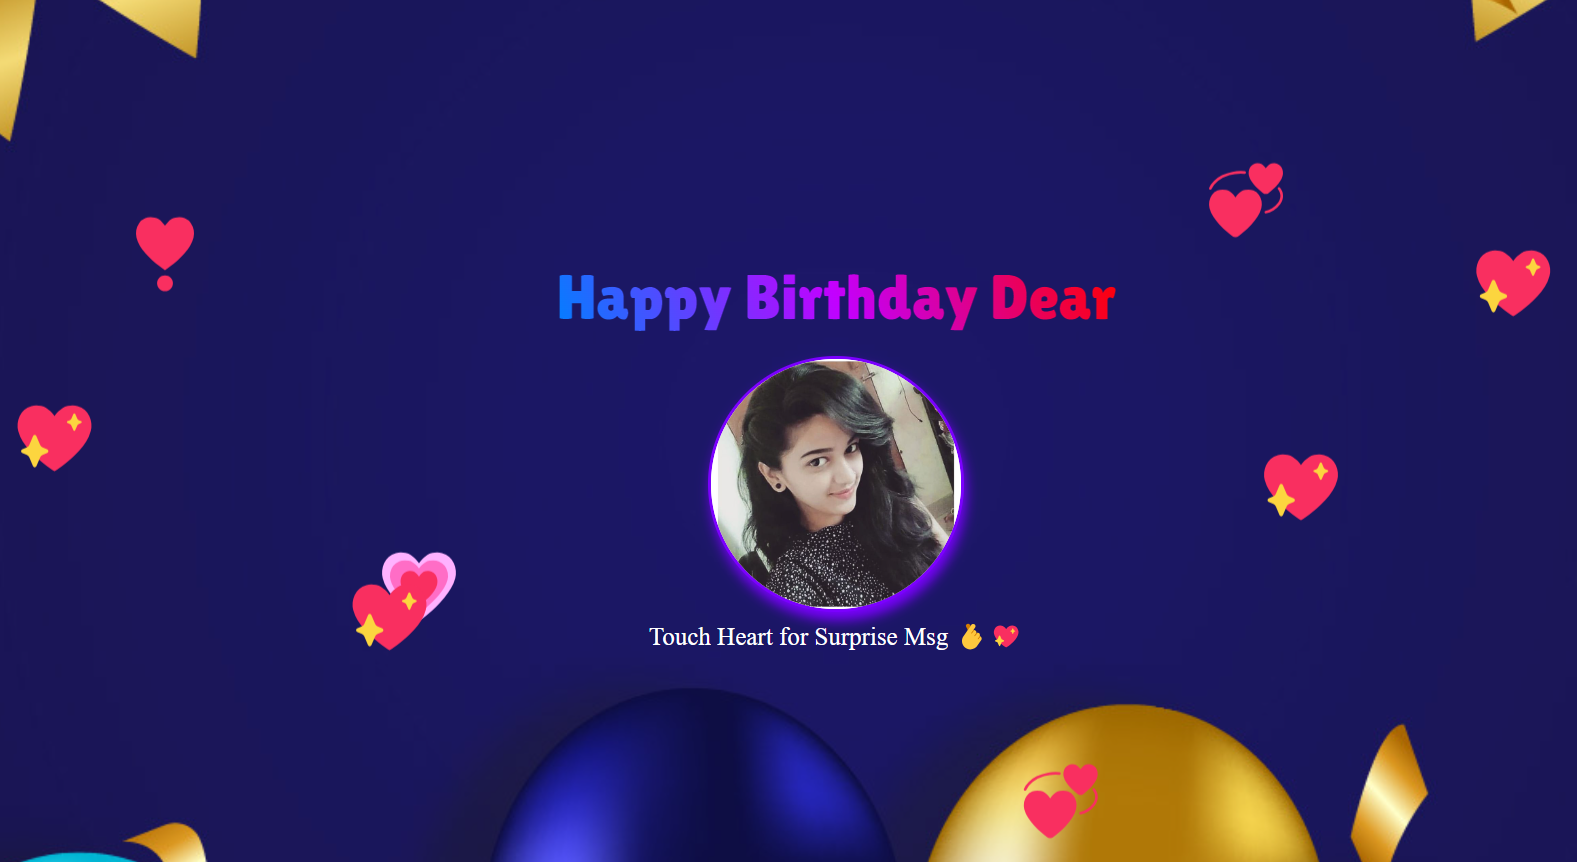
<div id="bdywish"><h3>Happy Birthday Dear</h3> <br>
<div class="heart-frame">
<img src="birdgirl.jpg" alt="Heart Image">
</div>
<p id="msg">Touch Heart for Surprise Msg 🫰💖</p>
</div>
<div class="heart" onclick="changeToText(this, 'Are you Marry Me?')">💖</div>
<div class="heart" onclick="changeToText(this, 'Are you be my future wife?')">💖</div>
<div class="heart" onclick="changeToText(this, 'You look like an Angel!')">💗</div>
<div class="heart" onclick="changeToText(this, 'Wishing you joy!')">💞</div>
<div class="heart" onclick="changeToText(this, 'You are very Gorgeous!')">💖</div>
<div class="heart" onclick="changeToText(this, 'Happy Birthday my Love!')">💞</div>
<div class="heart" onclick="changeToText(this, 'You are special for Me!')">💖</div>
<div class="heart" onclick="changeToText(this, 'You are my one and only!')">❣️</div>
</div>
</body>
</html>
HTML Explanation:
Heart Icons: Each <div> element with the class heart represents an individual heart icon. The hearts are styled and positioned using CSS, ensuring they are visually appealing and placed at random positions on the screen.
Interactive Click Event: The onclick attribute is used to handle click events. When a heart icon is clicked, the changeToText function is called. This function changes the heart icon into a text message.
Custom Messages: The changeToText function takes two parameters: the clicked element (this) and the message to display. Each heart icon has a unique message, such as “Are you Marry Me?”, “You look like an Angel!”, and “Happy Birthday my Love!”. This variety of messages makes the template more personalized and special.
Heart Symbols: The actual heart symbols (💖, 💗, 💞, ❣️) are used inside the <div> elements to display the heart icons. These symbols enhance the visual charm of the template.
By clicking on the heart icons, the recipient is greeted with sweet and loving messages, adding an element of surprise and delight to the birthday wishes. This interactive feature transforms a simple birthday greeting into a memorable experience.

JavaScript Interactivity
Finally, we add JavaScript code to make our birthday wishes template interactive. Here’s the JavaScript code snippet to be added at the bottom of the HTML file, just before the closing </body> tag:
    <script>
        document.addEventListener("DOMContentLoaded", () => {
        const hearts = document.querySelectorAll('.heart');
        hearts.forEach(heart => {
        const randomX = Math.random() * (window.innerWidth - 100);
        const randomY = Math.random() * (window.innerHeight - 100);
        heart.style.position = 'absolute';
        heart.style.left = `${randomX}px`;
        heart.style.top = `${randomY}px`;
        heart.classList.add('bounce');
    });
    });
        function changeToText(element, text) {
        element.style.transform = 'scale(0)';
        element.style.opacity = '0';
        setTimeout(() => {
        element.innerHTML = text;
        element.classList.remove("heart", "bounce");
        element.classList.add("happy-birthday");
        element.style.transform = 'scale(1)';
        element.style.opacity = '1';
        }, 500);
        }
  </script>
In the JavaScript code, we’ll use event listeners to handle interactions with the heart icons and create animations for a delightful experience.
Conclusion
With this HTML, CSS and JavaScript setup, you will have an attractive and interactive birthday wishes template to surprise and impress your loved ones. Feel free to customize the messages, styles and animations to your liking and create memorable birthday wishes! Happy coding and happy birthday!
Like More;

0 Comments